maximenu
maximenu
-
Add a parameter suffix to your link url

Have you ever tried to customize your menu item link url ? Maximenu CK offers you the ability to it !
You can add a suffix to your url so that you can really control how your url looks like and what parameters you put in it. This will integrate with the native Joomla menu items, it means that you can point to an article and also add some additional parameters to your url.
-
Aperçu des fonctions du constructeur de menu
Comment utiliser le constructeur de menus
Dans les options du module
Source, vous pouvez sélectionner la valeurConstructeur de menucomme source de votre menu. Cliquez ensuite sur le boutonSélectionnerpour sélectionner un menu dans la liste. Si vous n'en avez pas, vous pouvez en créer en utilisant le boutonNouveau.Vous pouvez modifier votre sélection à tout moment et modifier le menu en utilisant le bouton
Modifierdirectement depuis le Module Maximenu CK.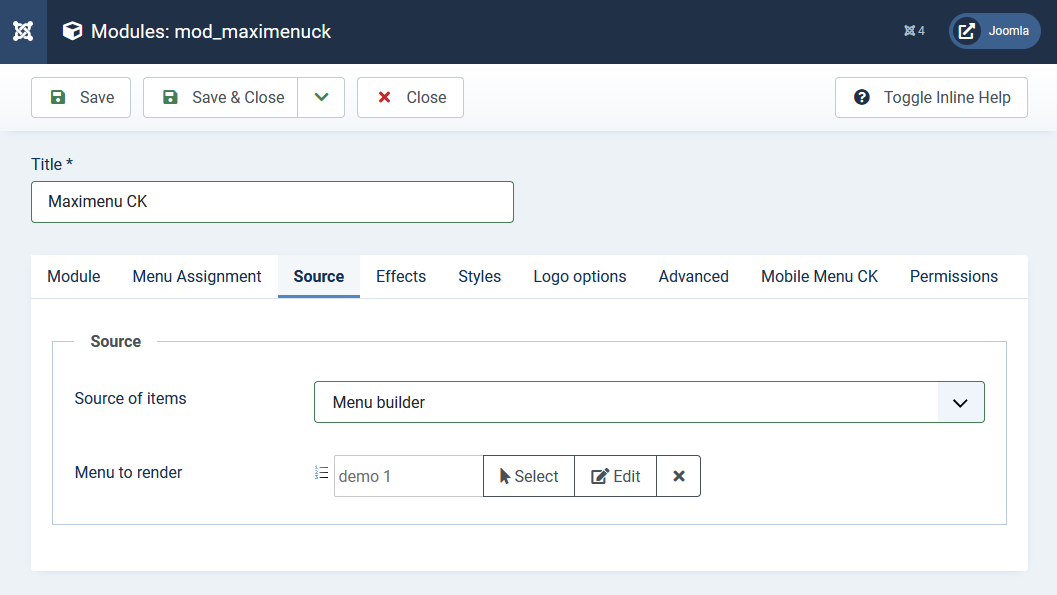
La fonction de création de menus de Maximenu CK vous permet de créer des mégamenus incroyables pour Joomla. Vous pouvez mettre les éléments où vous voulez dans votre menu sans avoir à vous soucier des urls car il les utilisera depuis Joomla.
-
Charger un module dans le menu
Pour charger un module dans votre menu, vous devez créer un élément de menu qui sera utilisé pour cela. À la place de l'élément de menu c'est le module que vous avez sélectionné qui sera affiché.
Le type d'élément de menu doit être un type de
séparateur: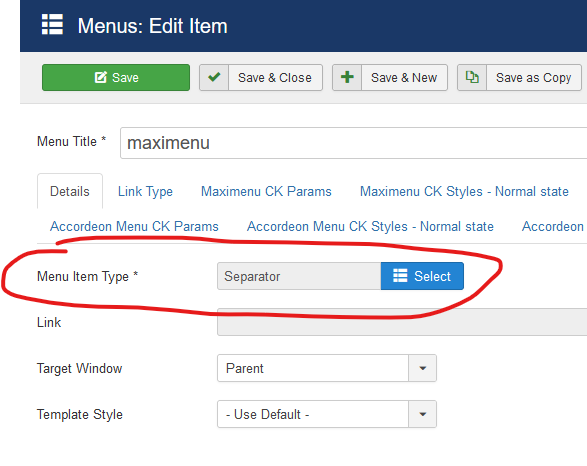
Si vous souhaitez charger un module dans un sous-menu, créez un élément de menu en tant que parent, puis créez un autre élément de menu de type séparateur en tant qu'enfant et chargez-y le module.
Depuis les options du module
Allez dans le module
Maximenu CK >> Onglet Source >> Menu >> Editer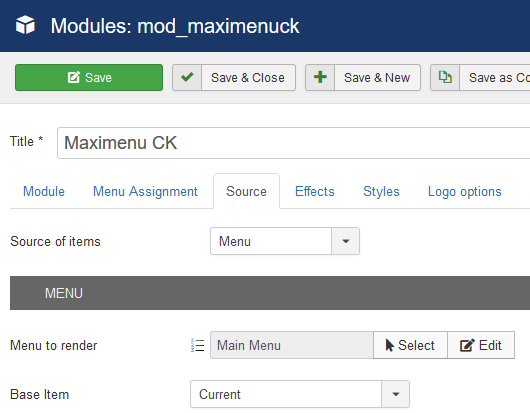
Cela ouvrira la fenêtre contextuelle où vous pourrez gérer facilement votre menu. Vous verrez chaque lien, avec de nombreux paramètres : titre, description, colonnes, sous-menu largeur / hauteur / position...
Cliquez sur l'icône à droite pour ouvrir la sélection des modules:

Vous pouvez placer votre souris sur chaque icône pour voir l'info-bulle avec les détails.
Cliquez sur l'icône du module pour ouvrir la fenêtre contextuelle avec la liste de tous les modules disponibles.

Cliquez sur le module que vous souhaitez charger et il sera directement ajouté à votre élément de menu :

Depuis les options du lien de menu
Allez dans le gestionnaire de menu Joomla, sélectionnez l'élément où charger le module et éditez-le.
Dans l'édition des éléments de menu, vous trouverez les onglets supplémentaires Maximenu CK, où vous pouvez jouer avec de nombreux paramètres. Allez dans l'onglet
Maximenu CK Paramspour obtenir les options des paramètres généraux : titre, description et bien plus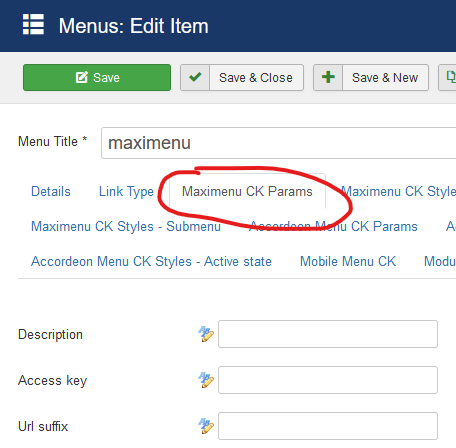
Regardez en bas pour trouver les options de
chargement du module, ici vous pouvez activer le module en définissant l'option surOui, et sélectionnez le module à charger dans la liste.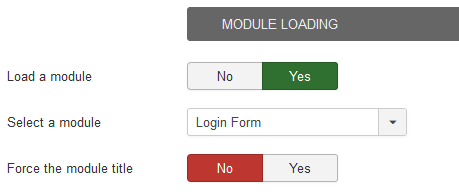
-
Comment créer un méga menu avec des onglets
Vous pouvez utiliser Maximenu CK pour créer un mégamenu (ainsi que d'autres types de menus) pour Joomla. Il existe une fonctionnalité qui peut être utilisée pour créer une mise en page avec onglets pour n'importe quel sous-menu. Vous pouvez sélectionner chaque sous-menu pour appliquer la fonctionnalité en un seul clic. Vous pouvez ensuite facilement configurer la largeur du sous-menu et la largeur de la colonne dans la disposition des onglets.
-
Comment créer un sous-menu pleine largeur
La création d'un sous-menu pleine largeur est l'une des fonctionnalités les plus intéressantes d'un méga menu. Vous pouvez le faire de 2 manières en utilisant Maximenu CK pour Joomla :
- Transformez tous les sous-menus dans un affichage pleine largeur
- Sélectionnez le sous-menu à rendre pleine largeur
-
Compile CSS Options
Compile CSS Options
Maximenu CK comes with an option to compile the CSS. This is useful to save some server loads and cache the CSS file.
This option has been developped to improve your SEO and speed up your website.
To find these options, go in the Maximenu CK module >> Styles Options.

The available options are :
- NO :No compile, the theme PHP file is loaded and all styles are generated and included in each page load (to be used when doing your styles).
- COMPILE :Compile all styles in a CSS page on each page load (only to be used when finished to create the compiled css file and test it). This will force to create the
- YES :Use the existing CSS file where all styles are compiled. No more process is executed, it only loads the static file to save some server loads and allow the file to be cached (to be used once you have finished to style your menu).
Warning with the option YES
Using the option YES, your styles will no more be updated if you make any changes in the interface. If you want to update them you will need to use the COMPILE option.
-
Create some amazing effects for your menu
Maximenu CK Params includes 18 themes with specific effects to create an amazing menu. These effect are largely insipired from the Tympanuswebsite and adapted to work with Maximenu CK.
-
CSS customization
We will study the modification of the CSS styles for anyone who is interested in modifying the CSS directly.
Note that this section describe how to make changes of styles with CSS, but you can do almost all this directly into a dedicated interface using Maximenu CK Pro.
1. How to change the styles
To change the menu styles with css we will play with the file
maximenuck.php.This file is located in the theme you have selected in the module options. For example if you are using the theme css3megamenu to render the menu, you will find the file in this theme.
The file is coded as PHP because it uses a dynamic ID which retrieve the ID that you have given in the module options
div#<?php echo $id; ?>
Example with ID
maximenuck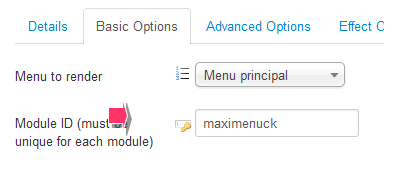
in the php file you must write it like this
div#<?php echo $id; ?> ul.maximenuck {and the browser will read the file and transform the code into :
div#maximenuck ul.maximenuck {This PHP variable shall be called for every css property you wan to add. You can have a look inside the file to see how it is made. This variable is needed to make your theme work with any module ID.
Now that you know where to work, you just have to play with the CSS.
2. HTML/CSS architecture
As detailed previously, a link is composed by the following elements :
<li class="maximenuck">
      <a class="maximenuck">
            <span class="titreck">Link title
                  <span class="descck">Link description</span>
            </span>
      </a>
</li>
So for example if you want to style the entire link (title and description) you can use the following CSS in the PHP file (maximenuck.php)
div#<?php echo $id; ?> span.titreck {
      color: red;
}
If you want to style only the description, you can use this code
div#<?php echo $id; ?> span.descck {
      color: blue;
}
3. Active links
When a link is clicked it becomes active when loading the page. Then we may give a particular style to identify it in the menu, but also give a style to its parents.
The active link that points to the actual page has the class 'current' and the class 'active':
<li class="current active">
All parents of the current link have the class 'active' :
<li class="active">
We finally have the following structure (example with two sub-levels):
<li class="active">
     ...
      <li class="active">
           ...
            <li class="current active">
In css you can easily identify it :
Title and description of the current element
div#<?php echo $id; ?> ul.maximenuck li.current > a span.titreck {
      color :red;
}
Title of the current element mouseovered
div#<?php echo $id; ?> ul.maximenuck li.current:hover > a span.titreck {
      color: red;
}
Description of the current element mouseovered
div#<?php echo $id; ?> ul.maximenuck li.current:hover > a span.descck {
      color: red;
}
Active parent title + current item title
div#<?php echo $id; ?> ul.maximenuck li.active > a span.titreck {
      color :red;
}
Active parent title level 1
div#<?php echo $id; ?> ul.maximenuck li.active.level1 > a span.titreck {
      color: red;
}
Here are some examples of use, they can be extended to obtain the desired result.
4. Styling each item separately
Each element can be identified with its Itemid. In the administration menu of Joomla!, when a link is created an ID is assigned. We find this information in the right column in the menu management.
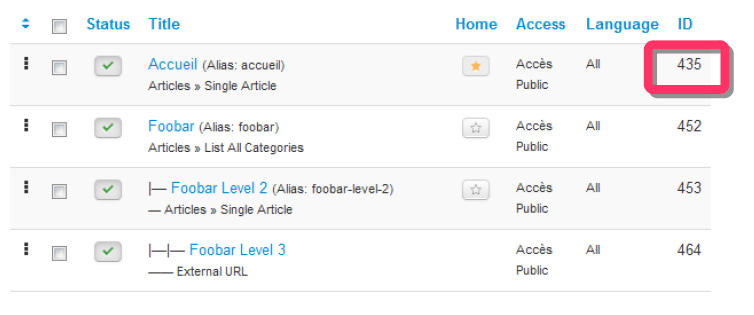
In the module Maximenu CK, each link receives a class with the ID of the item (for example with ID = 435):
<li class="item435">
In the CSS we can style this item only with this code :
div#<?php echo $id; ?> ul.maximenuck li.item435 {
      background: red;
}
div#<?php echo $id; ?> ul.maximenuck li.item435 > a span.titreck {
      color: blue;
}
5. Parent – child arrow
Since our menu has different levels it is interesting to know when an item has some children (to add an arrow for example).
Each parent of the menu has the class 'parent'
<li class="parent">
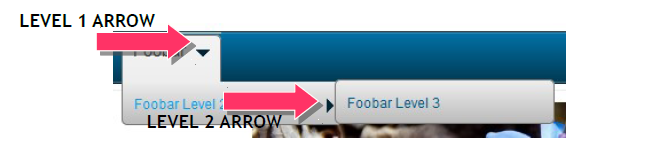
In the css you can use something like this :
Parent level 1 (to put a vertical arrow)
div#<?php echo $id; ?> ul.maximenuck li.level1.parent > a,
div#<?php echo $id; ?> ul.maximenuck li.level1.parent > span.separator {
      background:url("../images/drop.gif") no-repeat right 8px;
}
Parent level 2 to n (to put a horizontal arrow)
div#<?php echo $id; ?> ul.maximenuck li.level1.parent li.parent > a,
div#<?php echo $id; ?> ul.maximenuck li.level1.parent li.parent > span.separator {
      background:url("../images/drop-right.gif") no-repeat right 8px;
}
6. Submenu position and dimensions
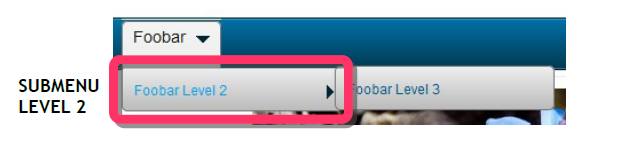
Each submenu is positioned relative to its parent item. You can move it to place it where you want. To do this you must set the margins on div.floatck (submenu container) and you can also set a width.
div#<?php echo $id; ?> ul.maximenuck li div.floatck {
      width : 180px; /* default width */
      margin: 2px 0 0 -10px;
}
This means that the submenu will move 2px from the top, and 10px to the left.
You can then position the submenu level 3 in the same way.
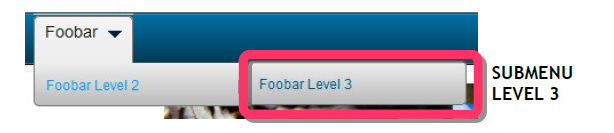
div#<?php echo $id; ?> ul.maximenuck li div.floatck div.floatck {
      margin: -30px 0 0 180px;
}
So it will take place 30px to the top from the bottom of the Foobar level 2 item, and 180px to the right.
7. Style the items by level
Each menu item is identified with its level, we can vary the style according to the level of the element.
The highest level is level 1, level directly below is the level 2, etc....
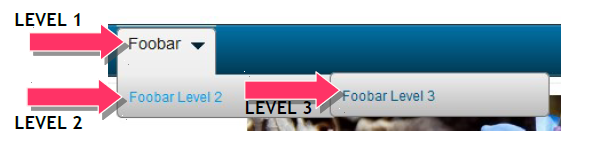
To each element is assigned the class 'levelX' where X is the level value (eg with level 2, the first sub-level).
<li class="level2">
In the CSS we have :
Top level element
div#<?php echo $id; ?> ul.maximenuck li.level1 {
      background: red;
}
All other items, after the level 1
div#<?php echo $id; ?> ul.maximenuck li.level1 li.maximenuck {
      background: blue;
}
8. Fancy effect – Moving cursor
The fancy is the moving cursor that is only visible for the level 1 items in horizontal mode.
Its HTML code is as follow :
<li class="maxiFancybackground">
      <li class="maxiFancycenter">
            <li class="maxiFancyleft">
                  <li class="maxiFancyright">
                  </li>
            </li>
      </li>
</li>
We can wonder why there is so many blocks, this is just to allow webdesigner to put the images they want to create a very advanced design.
In fact you just need to play with the center element like this :
div#<?php echo $id; ?> .maxiFancybackground .maxiFancycenter {
   border-top: 1px solid #fff;
}
You can also give it a height and a background image like this :
div#<?php echo $id; ?> .maxiFancybackground .maxiFancycenter {
background: url('../images/fancy_bg.png') repeat-x top left;
height : 34px;
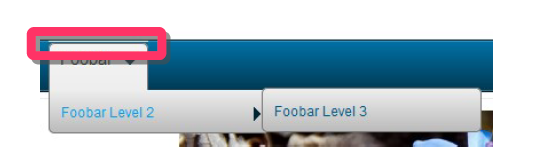
}9. Classes first – last
The menu items are also identified by a class 'first' for the first item of the column and 'last' for the last. In the css we can identify it like this :
div#<?php echo $id; ?> ul.maximenuck li.first {
      color: red;
}
div#<?php echo $id; ?> ul.maximenuck li.last {
      color :blue;
}
Sometimes the class is not correctly applied because of the menu structure (especially for the 'last' class). Don't forget that the CSS allows you to target these elements using the pseudo classes :first-child and :last-child.
10. RTL compatibility (Right To Left)
You can use Maximenu CK in a multilingual website and load some specific styles for a RTL language (arabic language for example).
To use this feature you must create your own css stylesheet with the suffix
_rtl:[site]/modules/mod_maximenuck/themes/[theme]/css/maximenuck_rtl.php
If you don't create this stylesheet, then the module will load the default stylesheet, but if it exists and the website is RTL then it will be loaded. You can put your own css to convert the menu to a right alignment.
-
Custom Canonical CK
-
How to create a Fullwidth submenu
Creating a Fullwidth submenu is one of the most interesting feature of a megamenu. You can do that in 2 ways using Maximenu CK for Joomla :
- Transform all submenus in a fullwidth layout
- Select which submenu to make fullwidth
-
How to create a megamenu with a tab layout
You can use Maximenu CK to create a megamenu (and also other types of menus) for Joomla. There is one feature that can be used to create a tab layout for any submenu. You can select each submenu to apply the feature just with one click. You can then easily setup the submenu width and the width of the column in the tab layout.
-
HTML Structure
If you want to play with the menu styles and structure you need to understand how it is rendered in the page. This is only based on the default layout because this is the one used for a dropdown menu.
1. Menu item
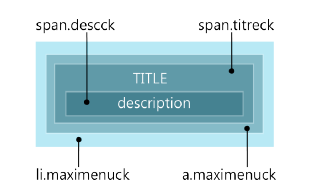
Each menu item is rendered as li.maximenuck.
(HTML code : <li class="maximenuck">...</li>)
Item anchor : a.maximenuck
This is the main element that contains the menu link (anchor) that points to the page where you want to redirect.
Note : if you use a separator item, then a.maximenuck is replaced with span.separator
Item text : span.titreck
This element contains the text of the item, which includes the title and the description.
Item description : span.descck
This element only contains the text for the description of the item
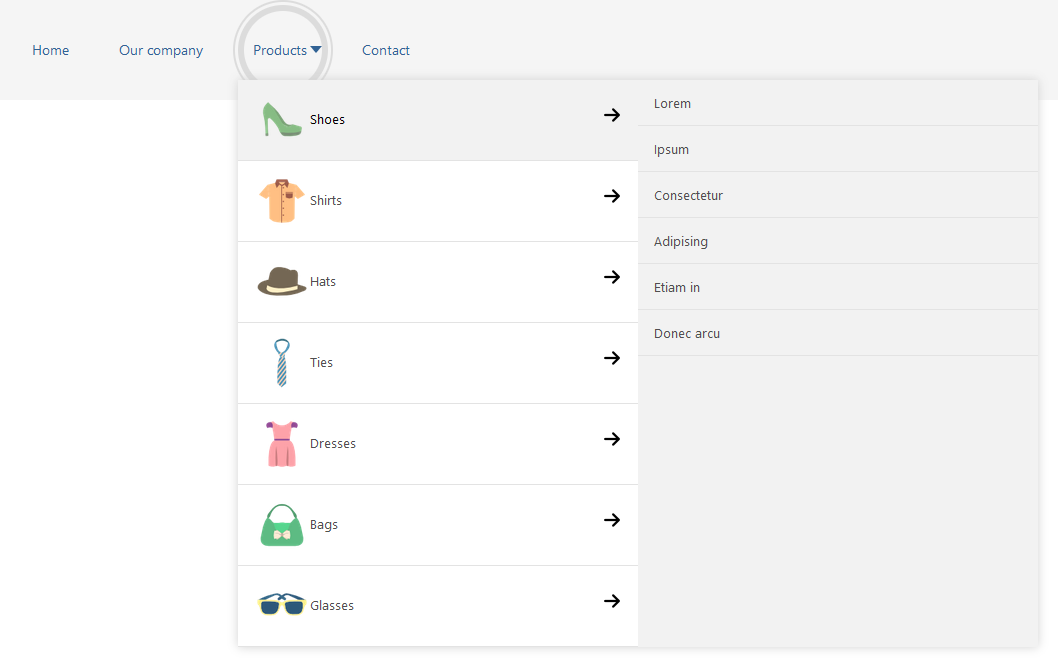
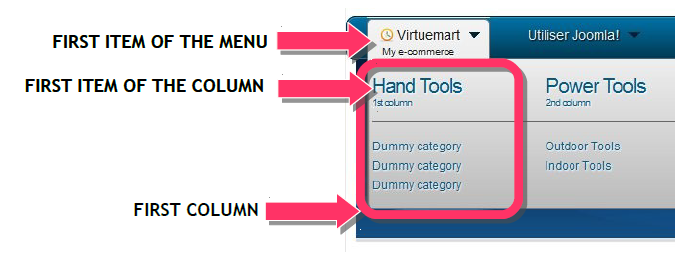
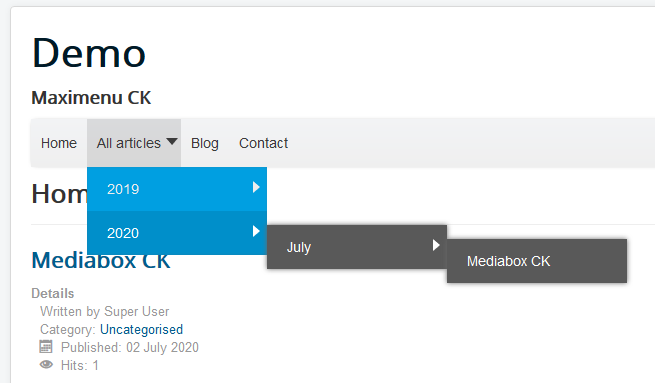
2. Submenu
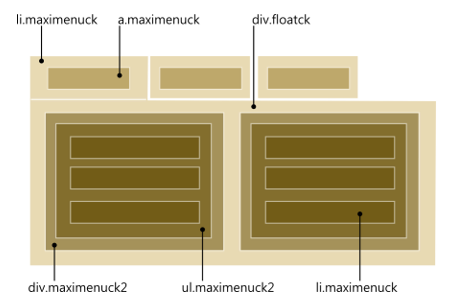
If you have some submenus, then there will be more html tags to examine.
The submenu (div.floatck) is loaded inside the item (li.maximenuck) that's why it is positionned relative to the left border of the parent item.
Submenu : div.floatck
This is the main submenu container. You can give it the background color, shadow or any style to adjust the submenu appearance. You can also give it the submenu width and height.
Submenu column : div.maximenuck2
In any submenu you can create one or more columns, these will take place in the container (div.floatck) and rendered in a new block (div.maximenuck2). This element will take the column width.
Submenu items list : ul.maximenuck2
This begins a new unordered list to show the submenu items (li.maximenuck).
-
Icons management
You can select an icon for each menu item directly from the interface of Maximenu CK
Go in the module >> Source >> menu >> edit
Then it opens the window where you can edit your menu. For each menu item you can click on the icon button, select the icon you want and that's it.
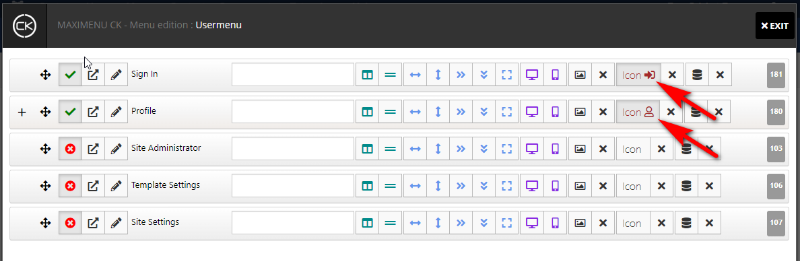
Then you can see the icons directly added in your menu

-
Image au survol
Vous pouvez ajouter une interaction dans votre menu en utilisant un effet de survol : placez votre souris sur un lien de menu et l'image d'aperçu dans la colonne changera en fonction des paramètres de cet élément de menu. C'est une fonctionnalité intéressante que vous pouvez facilement faire en utilisant Maximenu CK.
-
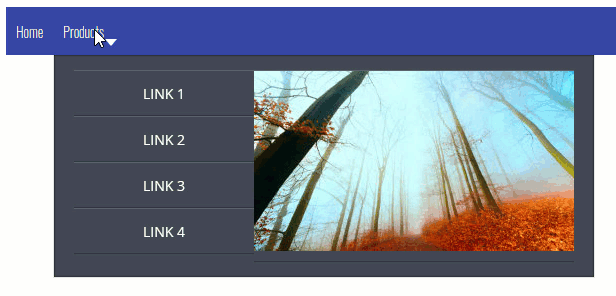
Image rollover
You can add some interaction into your menu using a rollover effect : put your mouse over an item and the preview image in the column will change according to the menu item settings. This is a cool feature that you can easily do using Maximenu CK.
-
List of available CSS classes
List of available CSS classes
When using Maximenu Params you can edit each menu item to access to the specific options for Maximenu CK.
One of them is called "CSS class on LI element".
You can use this option to set some feature to your item but also to the submenu.
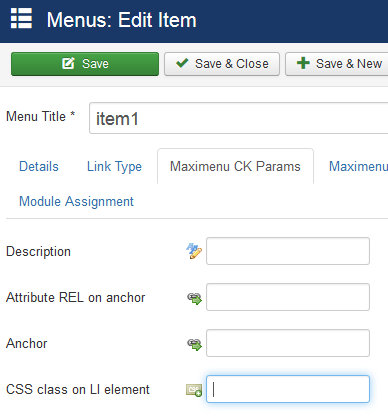
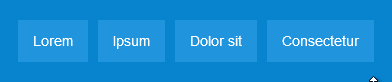
List of CSS classes
fullwidth
Allow you to create a full width submenu, but only for the submenu under this item
align_right
To use only on items level 1.
Make the item to be aligned at the right of the bar and put the submenu accordingly
blackbox
Render a black background with a smooth style for the item
greybox
Render a black background with a smooth style for the item
nodropdown
Stop the dropdown for the submenu. All items in this submenu will be listed in a flat design, without any dropdown. Note that this affects all levels under it, and you can not come back to the dropdown display in a deeper level of this submenu
showonclick
Force the submenu to appear on click, even if your main setting in the module is set on mouseover
clickclose
Force the submenu to close on click on the "close" button that appear in the submenu, even if your main setting in the module is set on mouseover
showonclickclose
Force the submenu to appear on click and to close on click on the "close" button that appear in the submenu, even if your main setting in the module is set on mouseover
-
Load a module in the menu
To load a module in your menu you must create a menu item that will be used for that. At the place of the menu item, it will render the module that you have selected.
The menu item type shall be a
separatortype :If you want to load a module in a submenu, then create a menu item as parent, then create another menu item type separator as child item and load the module in it.
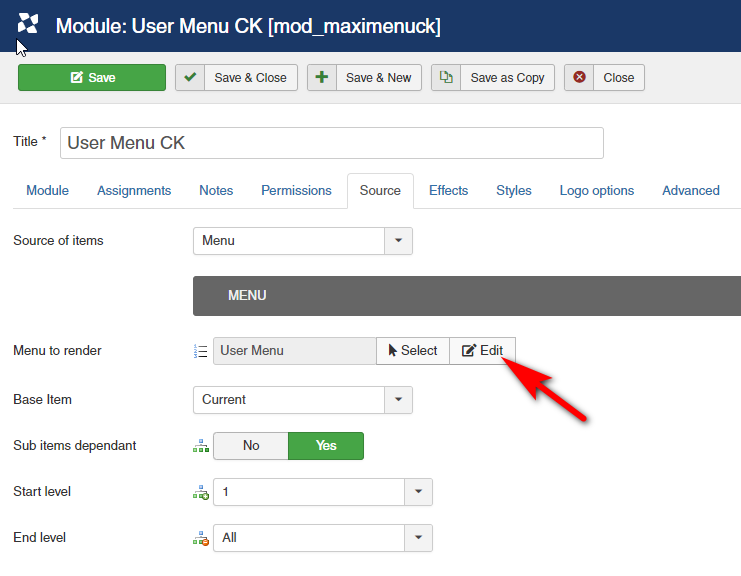
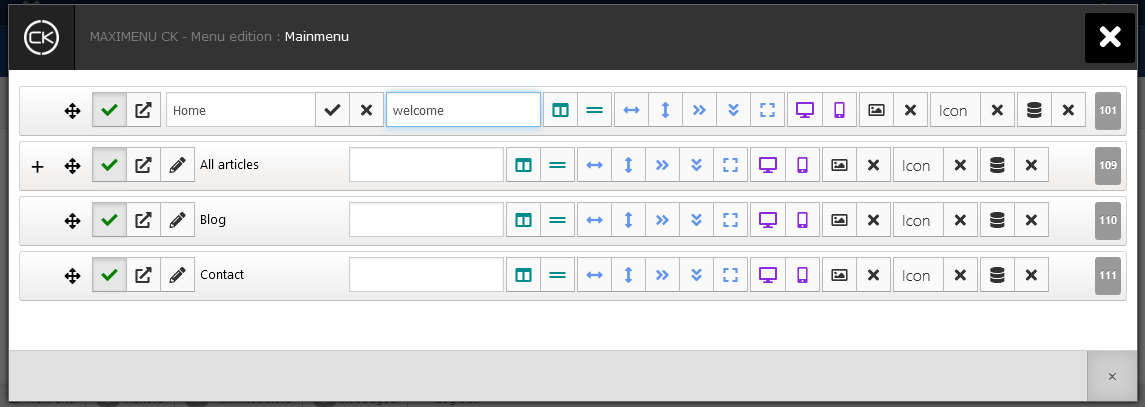
From the module options
Go in the module
Maximenu CK >> Source tab >> Menu >> EditIt will open the popup where you can manage your menu easily. You will see each link, with many settings : title, description, columns, submenu width / height / position...
Click on the icon at the right, to open the modules selection :
You can put your mouse over each icon to see the tooltip with the details.
Click the module icon to open the popup with the list of all available modules.
Click on the module that you want to load and it will be directly added to your menu item :
From the menu item options
Go in the Joomla menu manager, select the item where to load the module and edit it.
In the menu item edition you will find the additional Maximenu CK tabs, where you can play with many settings. Go in the tab
Maximenu CK Paramsto get the same options as for the general settings : title, description and much moreLook at the bottom to find the options
Module loading, here you can activate the module by setting the option onYes, and selec the module to load in the list. -
Maximenu CK
- Aperçu de Maximenu CK - Premier pas
- Aperçu des fonctions du constructeur de menu
- Creating the menu
- Parent item and submenu
- Types of menu item
- Mises en page
- Settings
- Html structure
- Styles customization (from the interface)
- CSS customization (by coding)
- How to change the styles
- HTML/CSS architecture
- Active links
- Styling each item separately
- Parent – child arrow
- Submenu position and dimensions
- Style the items by level
- Fancy effect – Moving cursor
- Classes first – last
- RTL compatibility (Right To Left)
- Miscellaneous
- Tuto : Create a megamenu with tabs (ancienne méthode)
- Tuto : Comment créer un méga menu avec des onglets (nouvelle méthode)
- Tuto : Créer un megamenu pour Hikashop
- Tuto : Créer un sous menu à partir d'autres sources
-
Menu builder feature overview
How to use the menu builder
In the module
Sourceoptions, you can select the valueMenu builderas source of your menu. Then click on theSelectbutton to select a menu in the list. If you don't have any, you can create it using theNewbutton.You can change your selection at any time, and edit the menu using the
Editbutton directly from the Maximenu CK module.The menu builder feature from Maximenu CK allows you to create some amazing megamenus for Joomla. You can put the items where you want in your menu without having to worry about urls because it will use them from Joomla.
-
Submenu dimensions and position
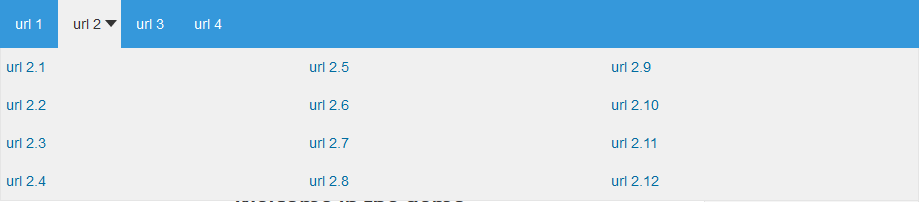
You can use the general settings to give the position and dimensions of the submenus for the whole menu, but you can also set specific settings on each submenu.
1. General settings
Go in the module and edit the style. In the
Styles tab >> Style, click on theEditbutton
In the styling interface go in the
Submenu tab >> Submenu >> dimensions. At this place you can set the submenus width and height, and position for the first level and second level of submenu.Note that in general you don't have to give a value for the height of your submenu, else you may have some problems. By default they take the content height.

In this example the settings are : submenu width = 180px + sub-submenu left position = 180px. This is the default settings that you shall use to start your menu.
By default in the themes, the submenu width is set at 180px and also the sub-submenu left position, like in this setting.
2. Custom settings for 1 submenu
You may need to set specific settings for each menu item and submenu. You can do that in 2 ways
- Edit the settings in the Maximenu menu manager from the module options (source tab)
- Edit the menu item in the Joomla menu manager
2.1. Edit the settings in the Maximenu menu manager from the module options (source tab)
Go in the module
Maximenu CK >> Source tab >> Menu >> EditIt will open the popup where you can manage your menu easily. You will see each link, with many settings : title, description, columns, submenu width / height / position ..
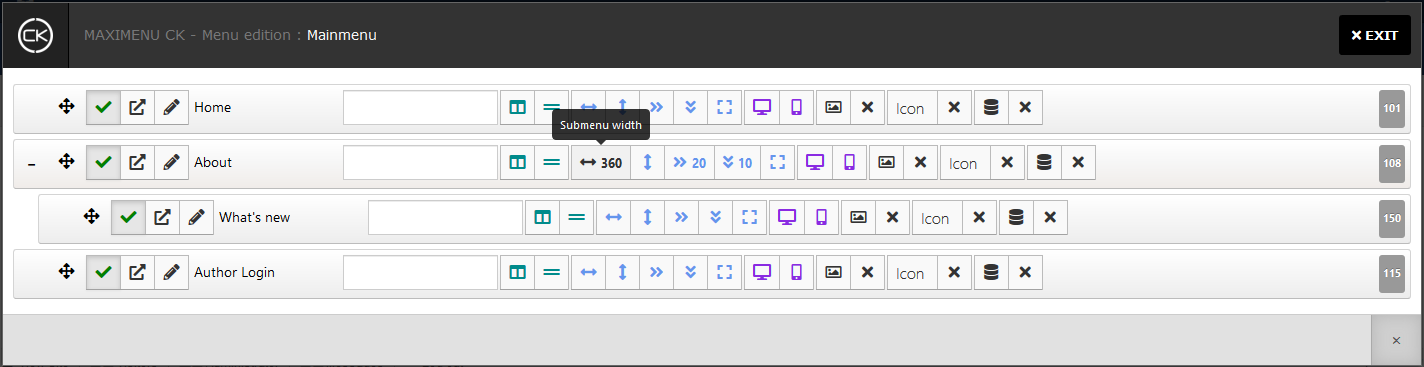
You can put your mouse over each icon to see the tooltip with the details.In this example we have set a 260px submenu width for the parent item
About, with a left offset of 20px and top offset of 10px.2.2. Edit the menu item in the Joomla menu manager
Go in the Joomla menu manager, select the parent item (where your submenu is located) and edit it.
In the menu item edition you will find the additional Maximenu CK tabs, where you can play with many settings. Go in the tab
Maximenu CK Styles - Submenuto get the same options as for the general settings : submenu width and height, left and top position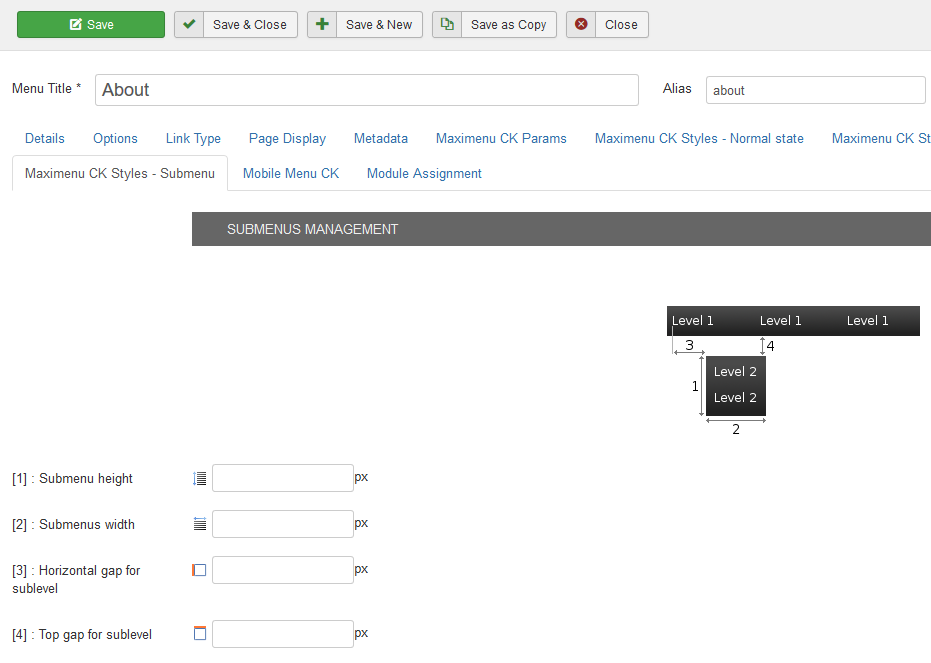
-
Title and description
From the module options
Go in the module
Maximenu CK >> Source tab >> Menu >> EditIt will open the popup where you can manage your menu easily. You will see each link, with many settings : title, description, columns, submenu width / height / position ..
You can put your mouse over each icon to see the tooltip with the details.
Double click on the title to edit it (or click on the pencil icon), you can then click on the tick icon to save it
You can write your description immediately in the field, it will update accordingly.
From the menu item options
Go in the Joomla menu manager, select the parent item (where your submenu is located) and edit it.
In the menu item edition you will find the additional Maximenu CK tabs, where you can play with many settings. Go in the tab
Maximenu CK Paramsto get the same options as for the general settings : title, description and much more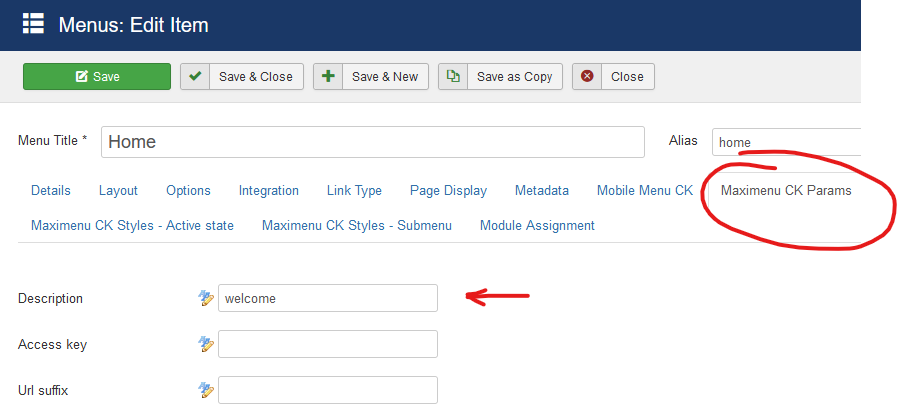
-
Tuto : Create a submenu from other sources
You can load other sources in your submenus in a fast and easy way. The sources can be for example : articles by date, articles by category, categories from Virtuemart, categories from Hikashop...
All these additional sources can be loaded automatically by Maximenu CK. This is available directly in the
Sourcetab of the module.But if you want to load these additional sources into a submenu, integrated into a normal Joomla menu, then you can use another method that is really easy.
-
Tuto : Créer un sous menu à partir d'autres sources
Vous pouvez charger d'autres sources dans vos sous-menus de manière simple et rapide. Les sources peuvent être par exemple: articles par date, articles par catégorie, catégories de Virtuemart, catégories de Hikashop...
Toutes ces sources supplémentaires peuvent être chargées automatiquement par Maximenu CK. Ceci est disponible directement dans l'onglet
Sourcedu module.Mais si vous souhaitez charger ces sources supplémentaires dans un sous-menu, intégré dans un menu Joomla normal, vous pouvez utiliser une autre méthode qui est vraiment simple.
-
Utilisation des icônes
Vous pouvez sélectionner une icône pour chaque élément de menu directement depuis l'interface de Maximenu CK
Allez dans le module >> Source >> menu >> éditer
Ensuite, il ouvre la fenêtre dans laquelle vous pouvez modifier votre menu. Pour chaque élément de menu, vous pouvez cliquer sur le bouton icône, sélectionnez l'icône que vous voulez et c'est tout.
Ensuite, vous pouvez voir les icônes directement ajoutées dans votre menu


News